How to Do the Kettlebell Windmill to Light Up Your Abs and Shoulders

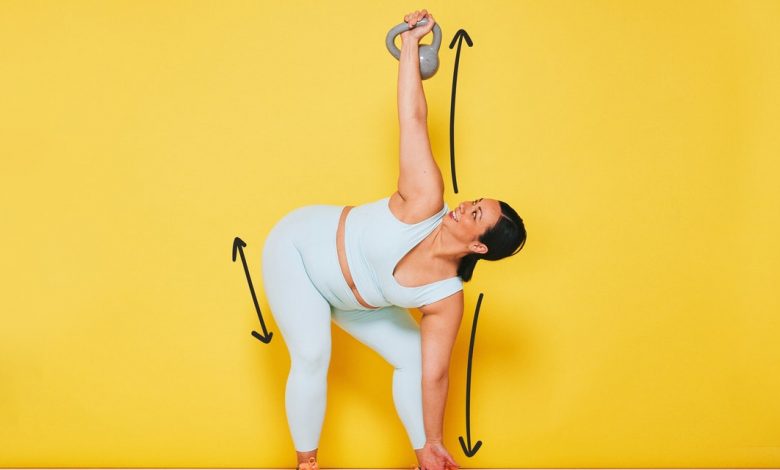
If you’re looking for an exercise that ticks all the boxes (strength, stability, and mobility), let us introduce you to the kettlebell windmill. This full-body movement—which involves holding a weight overhead while you push your hips back, rotate your torso, and reach your other arm toward the floor—packs in a whole lot of perks, making it a worthwhile addition to pretty much anyone’s workout routine.
“It has so many benefits,” Lacee Lazoff, certified personal trainer, certified kettlebell specialist, and founder of the kettlebell training program Bells Up, tells SELF. But the windmill isn’t run-of-the-mill: It’s actually quite nuanced, which is why knowing how to do it correctly is key. With that in mind, we tapped Lazoff for step-by-step instructions for mastering this multitasking move.
What muscles does a kettlebell windmill target?
The kettlebell windmill is a two-for-one exercise that strengthens and stretches muscles throughout your body. It’s a “total-body movement,” Lazoff says. On the strengthening front, it engages your entire core, including your rectus abdominis (front abs) as well as your obliques (muscles on the sides of your torso) and transverse abdominis (deep core muscles that wraps around your spine and sides), Lazoff explains. A lot of the core work comes from the fact that you’re rotating your torso as you reach your arm toward the floor.
It also fires up your shoulders (including your small stabilizing muscles) and lats (the broadest muscle in your back), as those help you hold the bell steady overhead, Lazoff adds. Then there’s the mobility aspect: The windmill delivers a really good stretch in your hips, hamstrings, and glutes, Lazoff says, all of which you will feel during the lowering portion of the move.
What are the benefits of a windmill?
Because the windmill involves lifting a weight overhead—and keeping it steady there—it’s great for shoulder stability, Lazoff explains. This is important, since more stable shoulders can reduce your chances of injuring that joint and improve your ability to use it effectively both in and out of the gym, whether you’re hauling a heavy bag or groceries, pressing weight overhead, or throwing a frisbee to your dog.
There’s the fact that you’re building core strength. When you rotate your torso underneath the weight, you automatically fire up a ton of muscles in your midsection. “You’re really using your full core, so your abs in the front all the way to the ones that wrap around the back,” Lazoff explains. Having comprehensive strength in this powerhouse muscle group—and not just your front abs—has big-time functional benefits, helping you maintain stability across your entire body and reducing your injury risk in tons of scenarios, whether that’s hauling a hefty bag of groceries or squatting with a stacked barbell in the gym, SELF previously reported.
Finally, the windmill is a stellar active stretch. Do it correctly and you’ll feel lengthening in the leg on the side that’s holding the weight, especially in your groin and hamstrings. “If you’re somebody that is a little bit tight, it can be awesome for a warm up because it really hits that [area],” Lazoff explains.
Okay, but is the windmill a strength exercise or a stretch?
Good question, since it hits on both! You could make arguments for which box it checks better, but Lazoff sees it as more of a mobility move that offers a “sprinkling of strength,” she explains. That’s because she doesn’t recommend going super heavy with your weight here, since doing so can compromise your range of motion as you complete the rotation. Instead, she recommends using a more moderate weight and allowing the move’s mobility benefits to take center stage.
What are some form mistakes people make?
A common one is sticking your hips out to the side as you lower down instead of pushing them behind you, Lazoff says. Doing so will limit your torso rotation—which will reduce those stellar core benefits—and shortchange the stretch on your groin and hamstrings, she explains. It can help to perform the move next to a wall: Stand with your back leg parallel to the wall and make sure that as you move, your hip doesn’t hit the wall, but instead glides alongside it.
Another no-no is trying to go all the way down to the floor. Aiming for that much movement can cause your hips to shoot to the side, which as mentioned will reduce the mobility benefits. Instead, only go down as far as you can while maintaining good form. This will vary person to person, but as a general goal, aim to get your wrist in line with your knee, or perhaps slightly lower, Lazoff says.
Who shouldn’t try the kettlebell windmill?
Because the exercise requires a lot of shoulder strength and stability, if you have issues in that joint, this probably isn’t the move for you. Not sure about your shoulder capabilities? Try the move without a weight first, Lazoff suggests. See if you can keep your arm lifted straight over your head without scrunching your shoulder into your neck (basically, keep the shoulder pulled down and back) and hold that position as you rotate your torso—don’t let your arm pop out to the side. If you struggle to keep your arm in a fixed position, work on improving your shoulder strength and stability before returning to the windmill. (Here’s a four-move workout that can help.)
Curious about the windmill but not yet ready for the full-on version? Consider the half-windmill, which is less intense since you’re closer to the ground: Get into a half-kneeling position with your front foot firmly planted and back knee and toes on the floor. Hold the weight on the side of the front foot and perform the move from there. Unlike the OG windmill, your hand will touch the ground here.
What’s the best way to slot them into your workout?
Because the windmill is great for boosting mobility, Lazoff loves to incorporate it into a warm-up, especially if your workout has you pressing weight overhead or hinging, like with deadlifts, since proper windmill form involves pushing your hips backward. It also works well as active recovery following high intensity strength moves, like kettlebell swings, snatches, or push presses, Lazoff says.
However you slot it in, aim for three to five reps per side, Lazoff says. If you feel tightness at the bottom of the move, consider hanging out there for about 10 seconds, focusing on breathing and holding the position to help loosen things up. In that case, you may opt for just three reps, since you’re placing your muscles under tension for more time. But if you don’t feel tight as you lower down, you may opt to skip the bottom hold and complete five total reps.
As for choosing the right weight, start out with something you can press over your head for at least five reps, going all the way to the top and all the way back down. You shouldn’t be completely gassed by the fifth rep, but instead should feel good and comfortable there, Lazoff says. If that begins to feel easy, go up slightly in size, she says—for example, swap your 10-pound kettlebell for a 12-pounder.
Can you do a windmill with a dumbbell?
Yep! Just keep in mind the move will feel a little different depending on which one you choose. With a kettlebell, the weight rests against your arm, whereas a dumbbell extends out to the side, “kind of like a little barbell,” Lazoff explains. She finds the former helps things feel “a little more fluid,” since it’s almost like the bell is attached to your body. But if you’re not very familiar with kettlebells, a dumbbell may feel more comfy for you.
Whichever one you choose, make sure to look at it while you’re moving, Lazoff says. This will help with your stability and proprioception (ability to sense where you are in space), she explains.
How to do the kettlebell windmill
Katie Thompson
- Stand with your feet between shoulder and hip-width apart, with both feet facing forward, both feet turned about 45 degrees to the left, or with the foot holding the kettlebell facing forward and the other turned out. Try out the different foot positions and pick whichever stance feels most comfortable for you—and which allows you to push your hips straight back.
- Hold the weight in your right hand and raise that arm straight overhead, knuckles up. Pull your right shoulder down away from your ear and lock the arm out strong. Keep your left hand resting by your side. This is the starting position.
- Place the majority of your weight on your right foot. Keeping your right arm directly overhead and your eyes on the weight, push your right hip back as you turn your belly Hinge forward at your hips as you lower your left hand down toward the ground along your left leg, rotating your upper body slightly inward so that your right arm stays pointing button toward your right leg.
- at the ceiling.
- When you can’t push your right hip back anymore, pause for a moment. Then, press through your right heel to slowly reverse the movement and return to the starting position. Keep your right hand raised straight above you the whole time.
- This is 1 rep. Do 3 to 5 reps, then switch sides and repeat.
Related:
- How to Do the Wall Sit Exercise to Completely Light Up Your Quads
- 15 Kettlebell Exercises That Will Work Every Muscle in Your Body
- 15 Plyometric Exercises That Build Explosive Strength
Get more of SELF’s great fitness coverage delivered right to your inbox—for free.


